Our teams and organization feature makes working together simple and effective.
Some basics about Organizations in Bublup:
-
- Creating an Organization requires a Business or Enterprise account.
- Anyone invited into an Organization will be asked to create a Bublup account, if they do not already have one.
- The Organization owner’s storage is shared by all of its members.
- Org Members have access to these features.
- # of Members:
- Business: 3 staff included
- Enterprise: 10 staff included
- Additional members available for purchase for $10/month.
Setting up your Organization
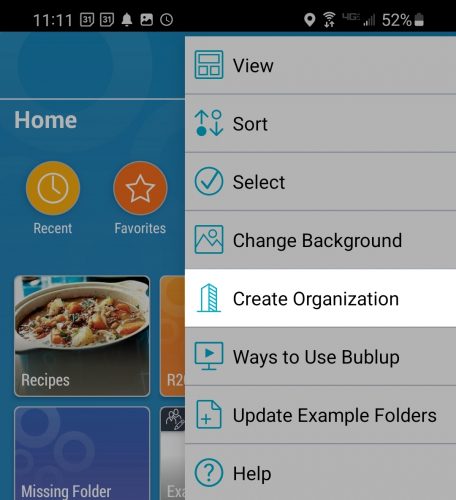
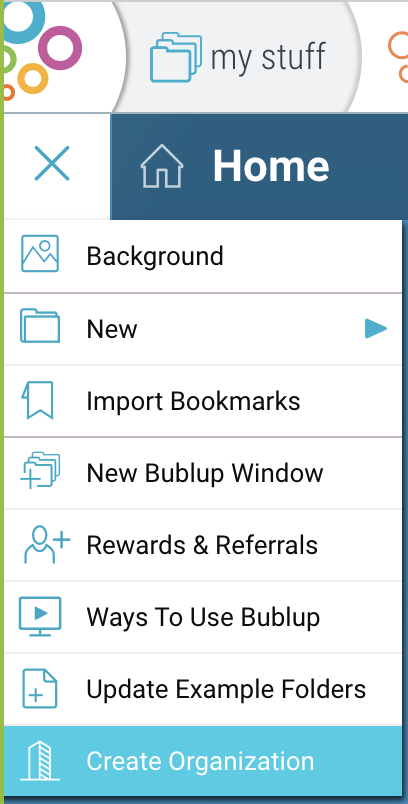
If you have subscribed to a Business or Enterprise plan, you should automatically have an organization added to your Bublup home, or you can create an organization by going to the home menu and selecting “create organization”.
Note: you can only own one organization, though you can be a member of multiple.
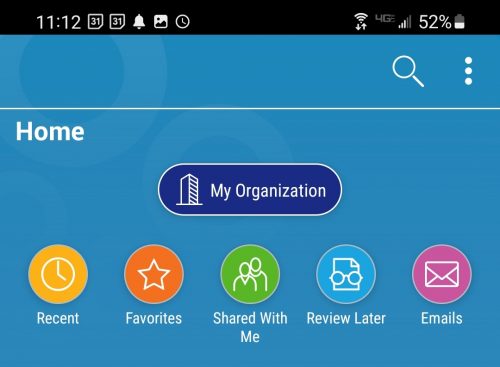
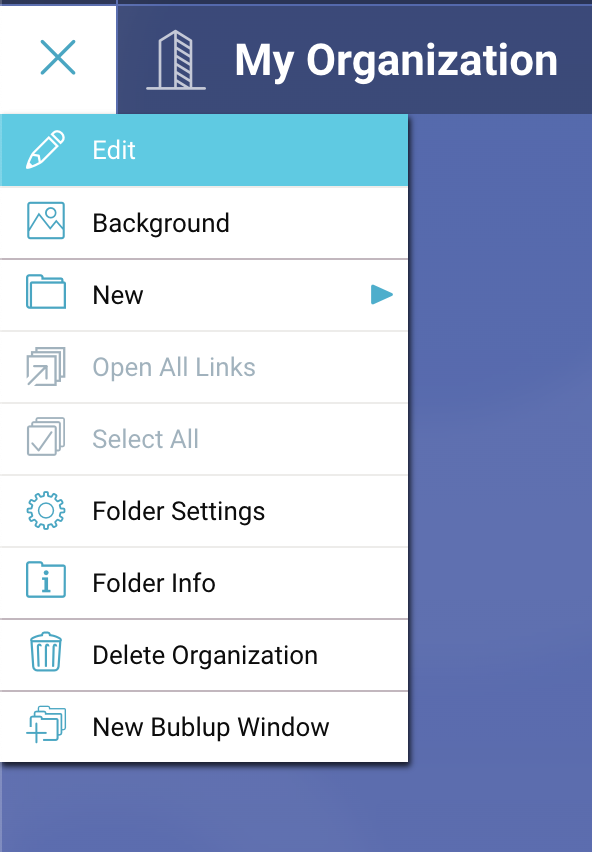
The owner of an organization will see it as a special folder in Home. All other members will see their Organization as a shared folder, but with a special org icon.
![]()
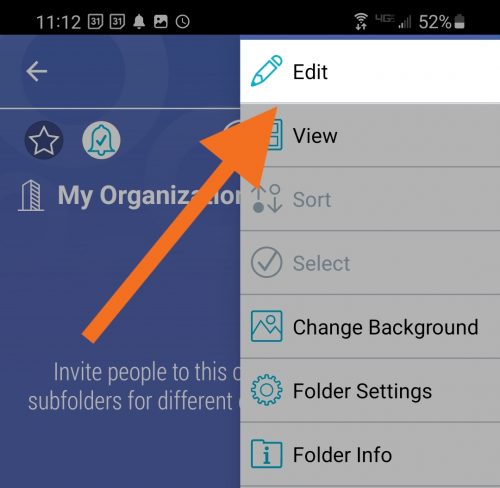
You can rename your Organization by selecting “edit” in the main menu at the top-level folder.
Purchasing & Managing Org Members
With Business, your first 3 members in your Organization (plus the owner) are included for free (with an Enterprise plan, it’s 10 free). For each additional Org member, you will be charged $10 per month. Org members have access to these features.
To purchase additional members, you must have a payment method on file with us (separate from your app store subscription). Visit Bublup’s payment site on desktop to add or update your card on file. Here you can also view your payment history and download invoices.
Once this is done, simply add members to your Organization, and you will automatically be charged each month based on the number of Org Members.
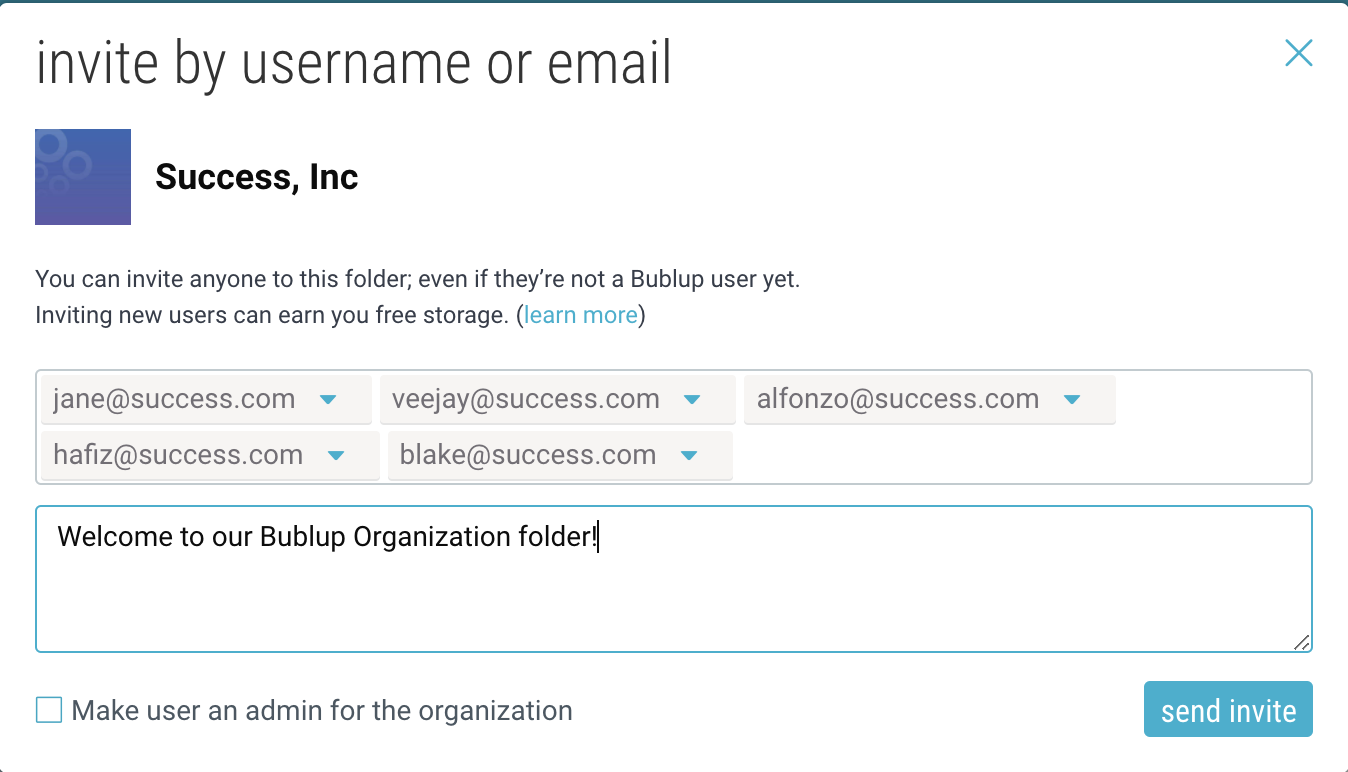
Adding members
Start filling your Organization by inviting members. The default permission for members is “view”, with the option to make them an “admin”. These permissions are for the Organization only. More refined permissions, “view”, “add”, “edit”, or “admin”, can be set on a subfolder level based on needs.
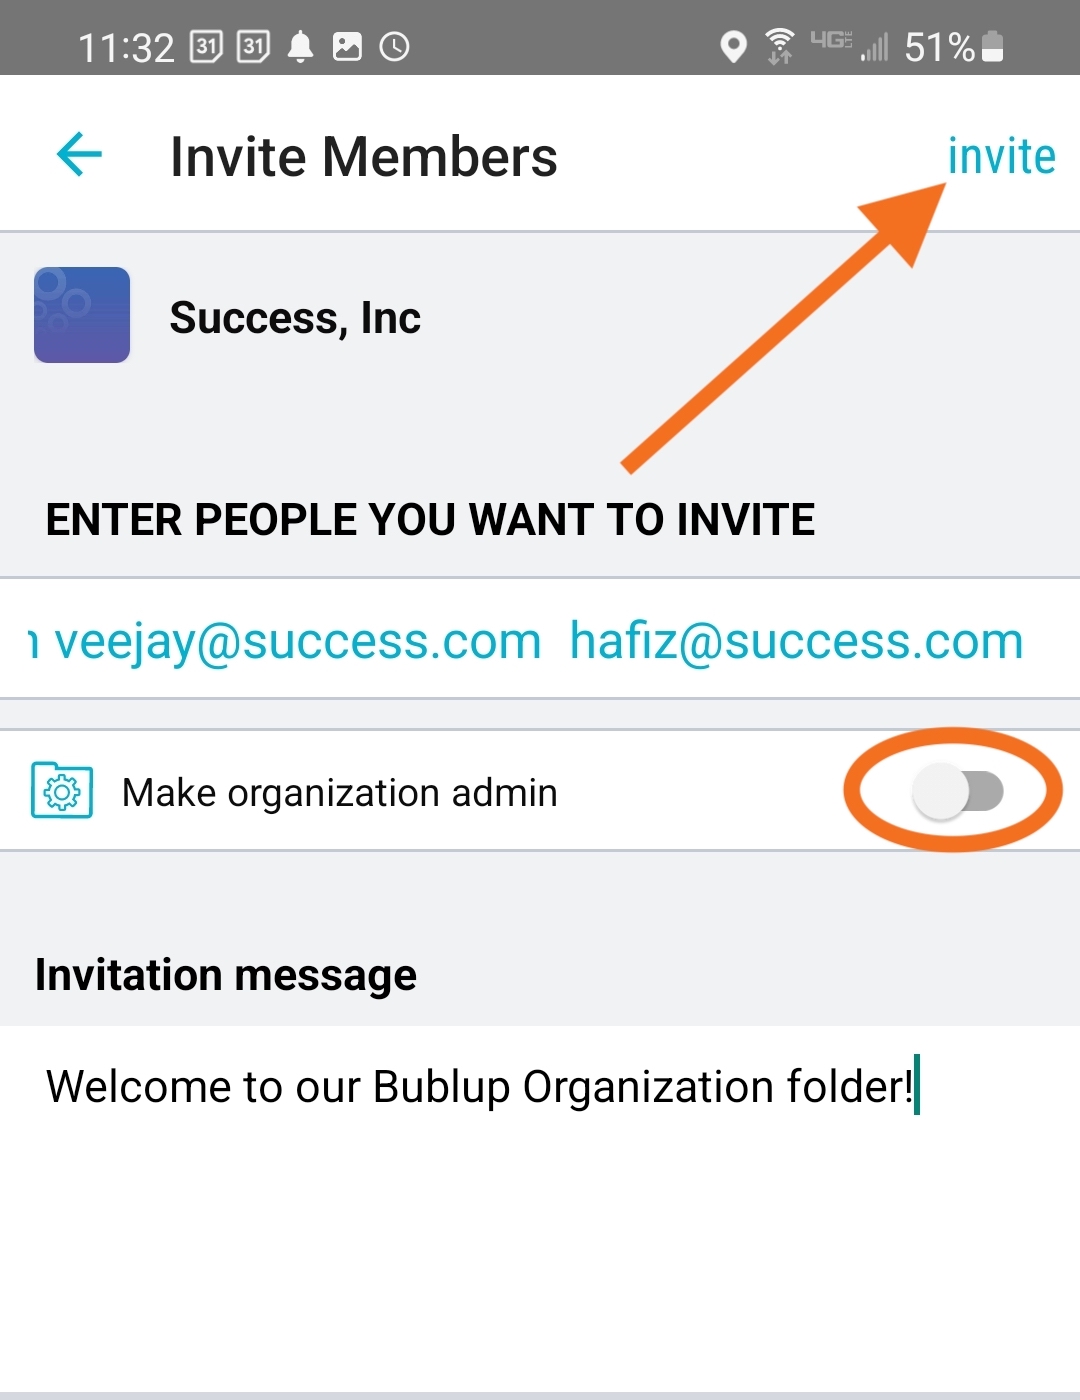
Note: A user does not need to be a member of the top-level Org in order to be invited to folder within the Org. Learn more about advanced member management here.
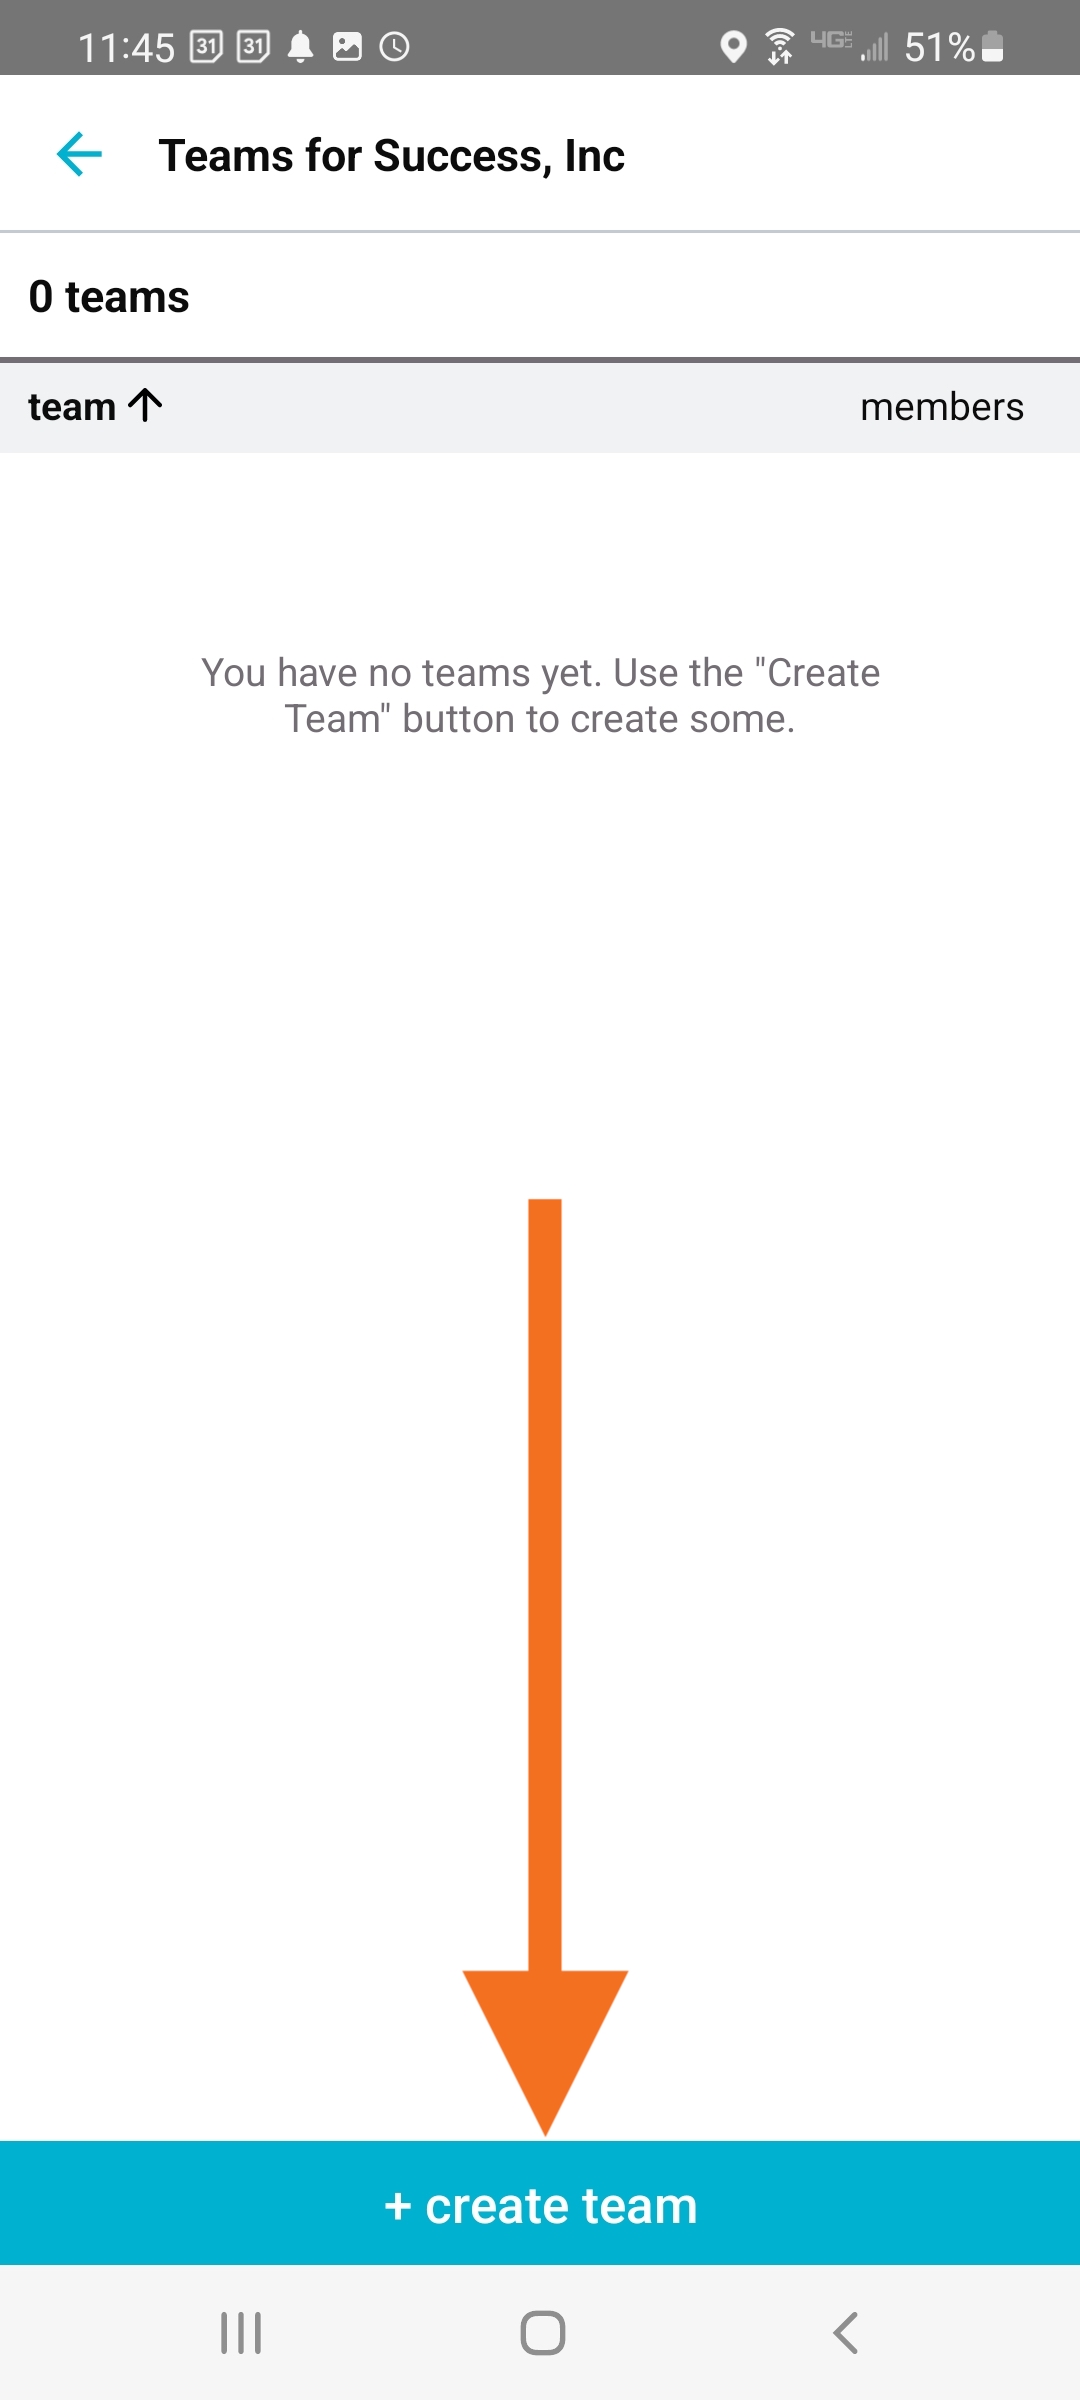
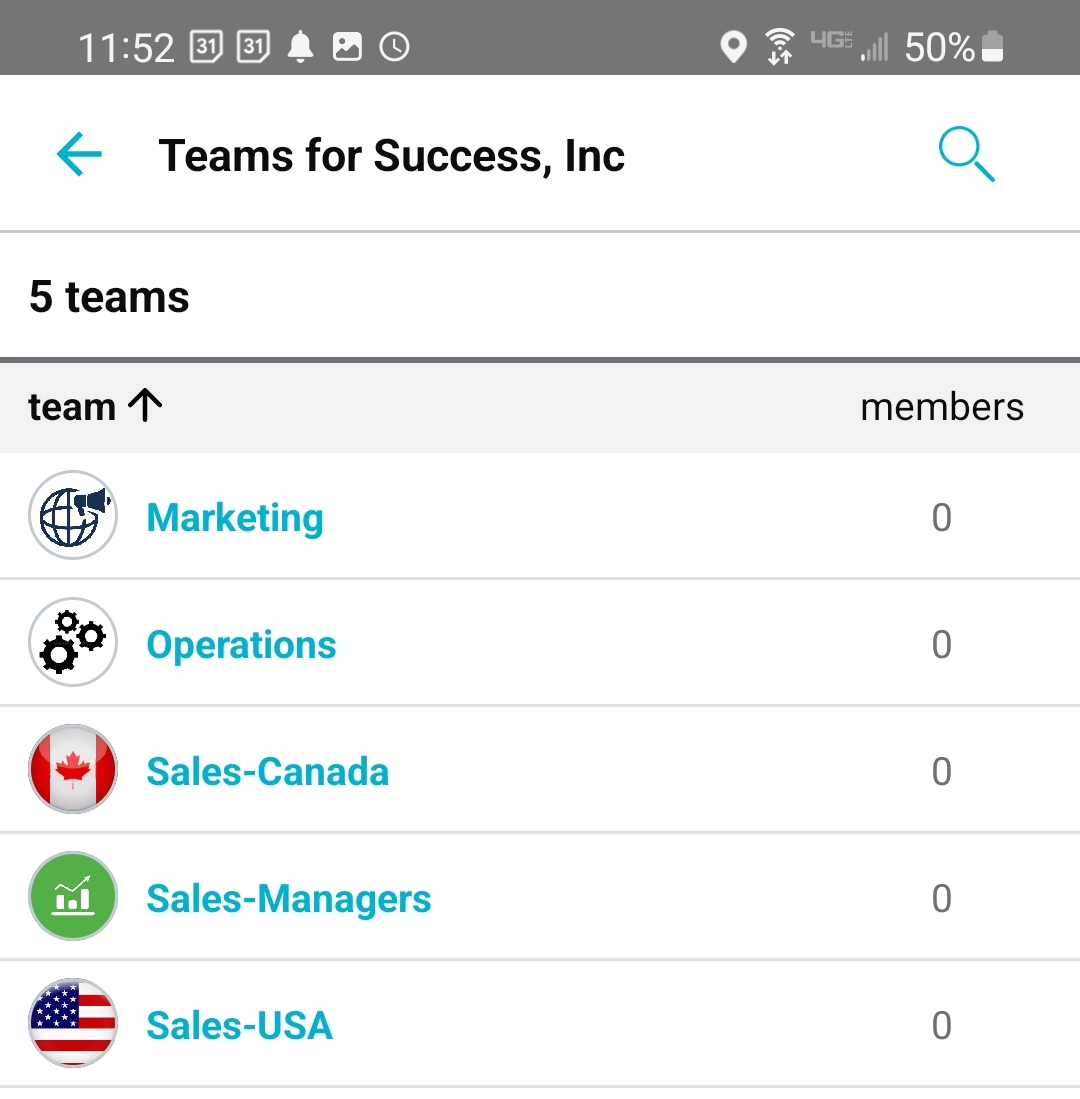
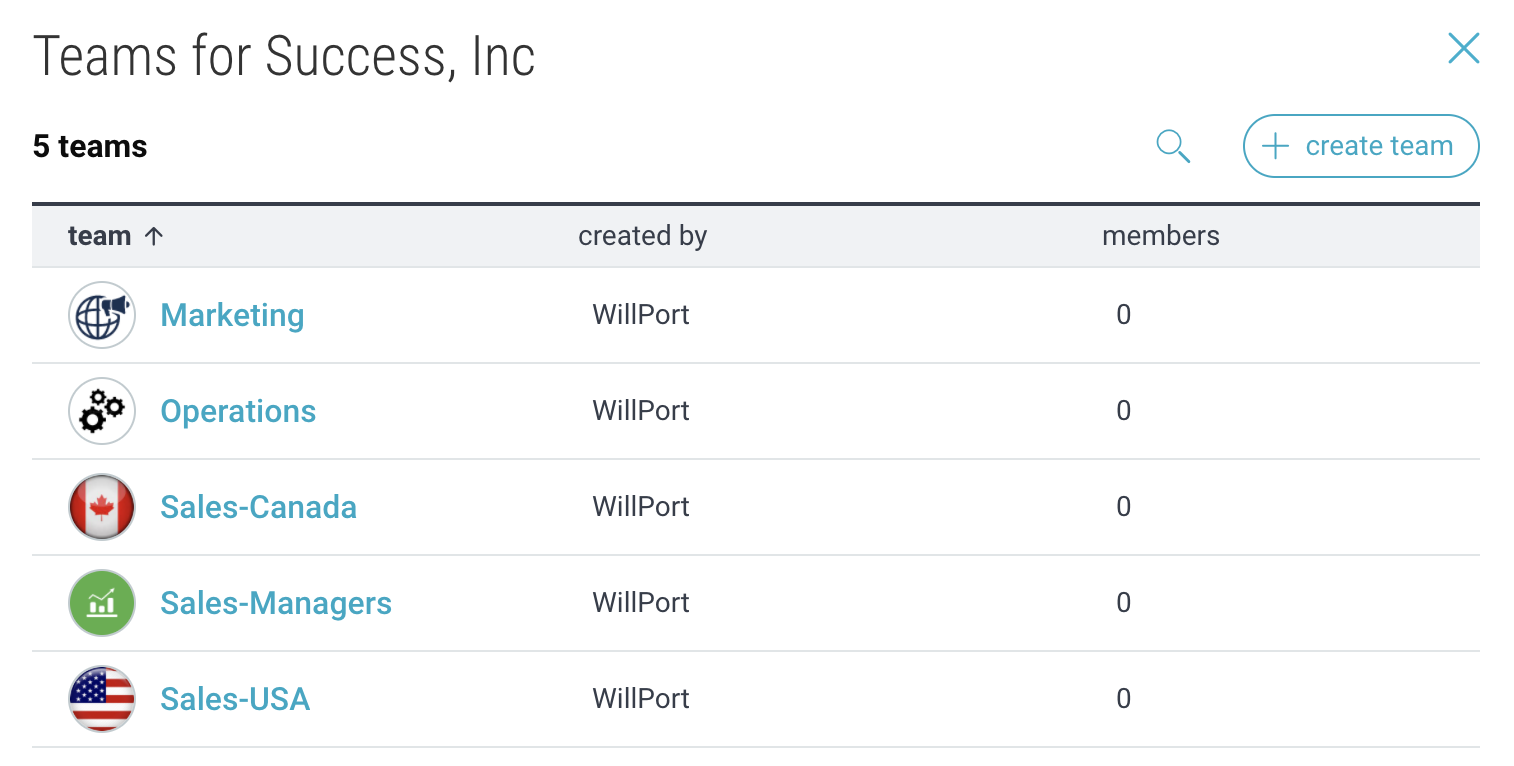
Using teams for easier member management
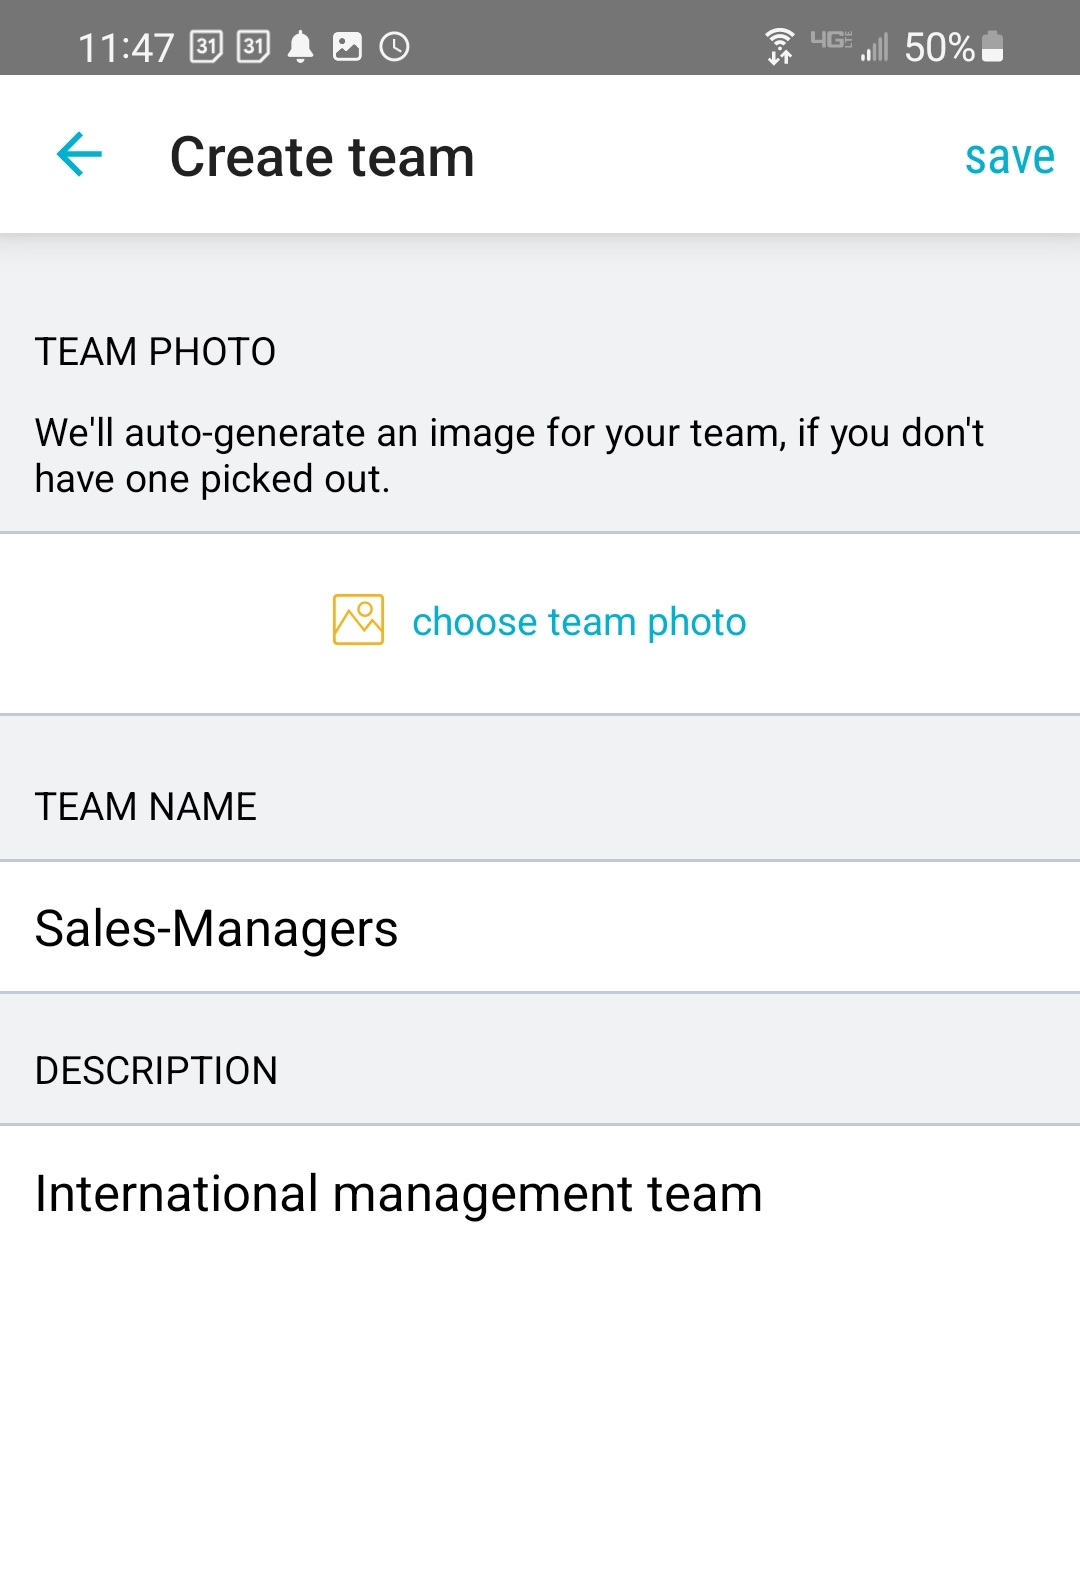
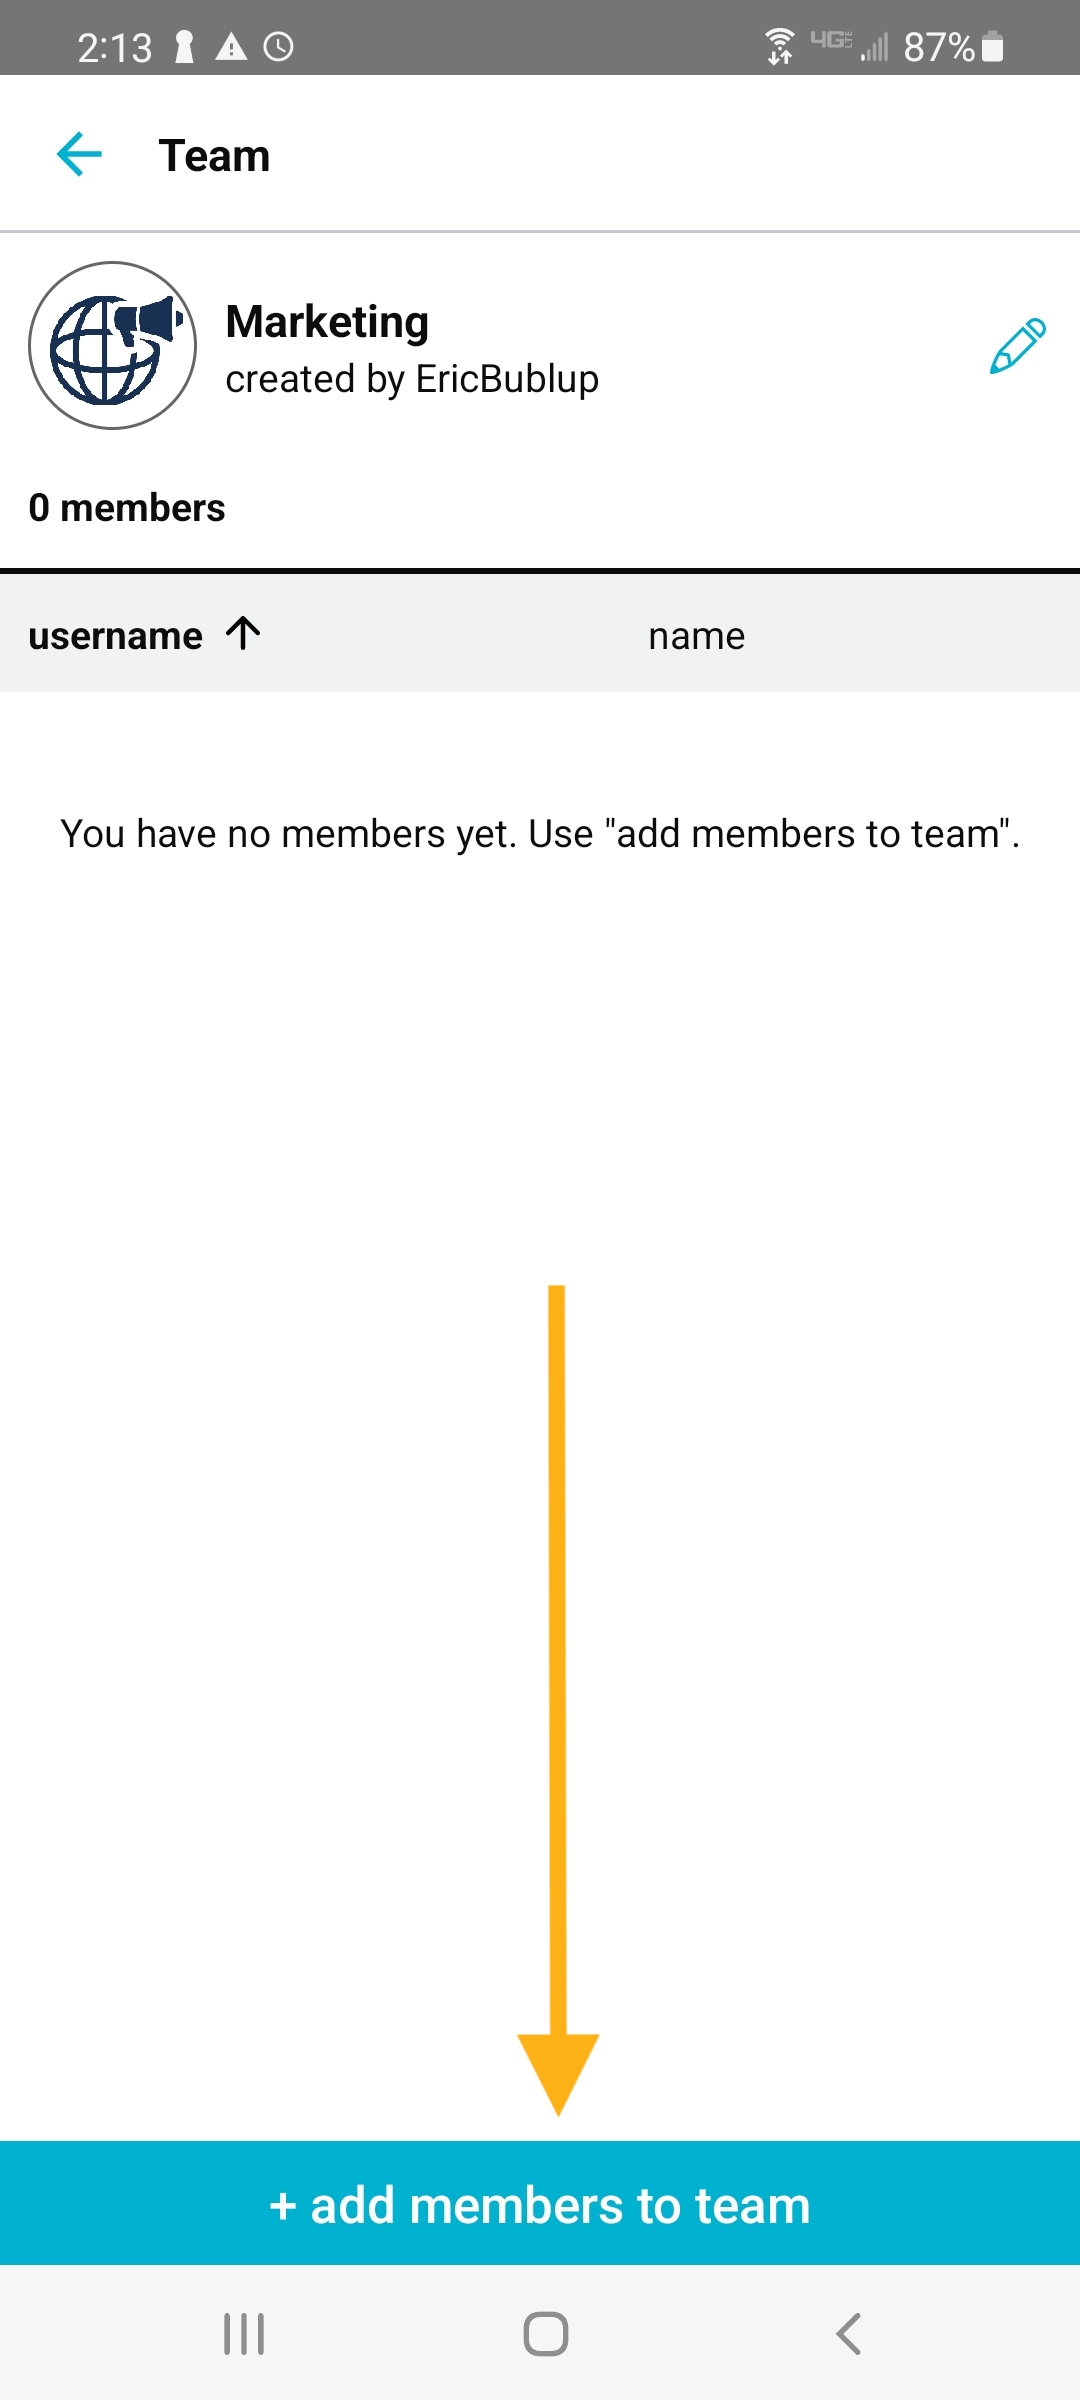
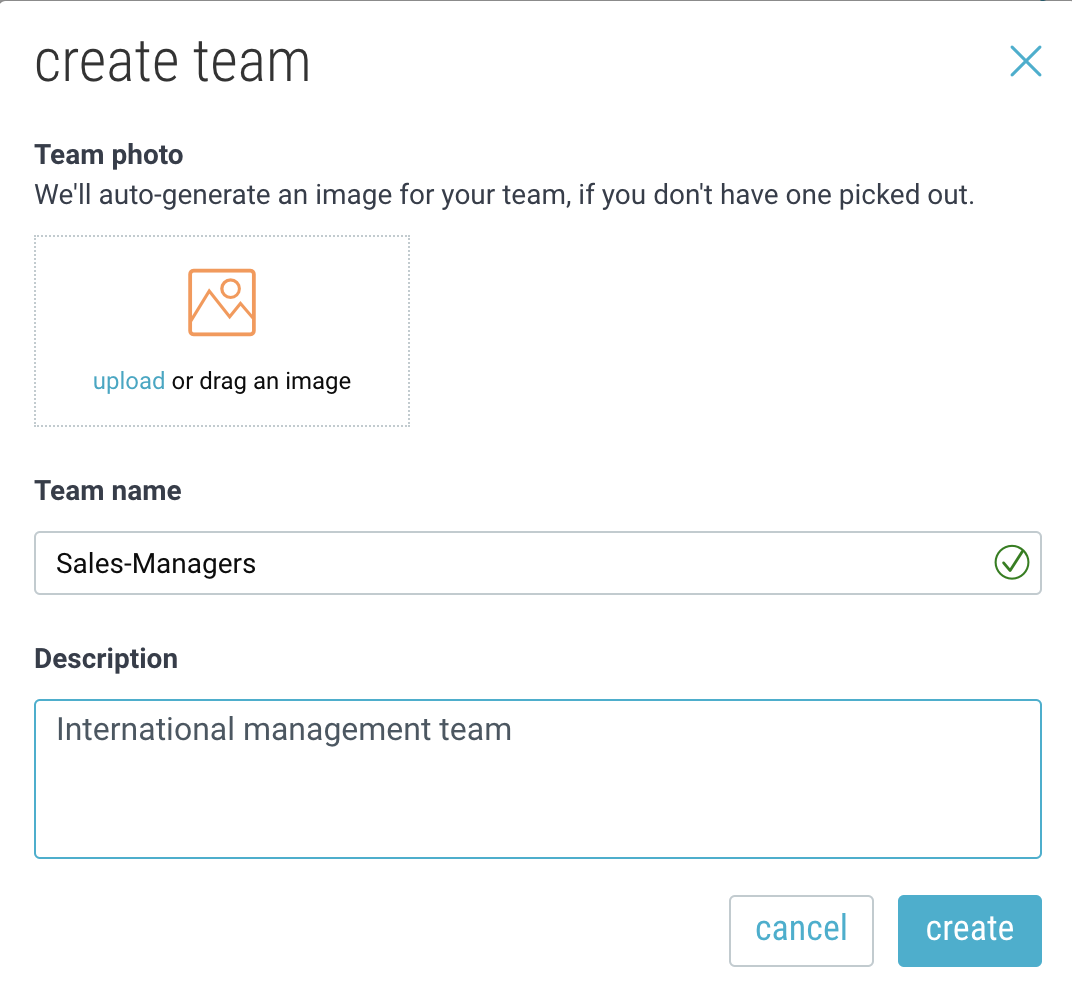
Once you have members, you will want to create your Teams. Tap on the “teams” button and then select “create team” to begin.

Teams must have unique names, which can only contain letters, numbers and dashes*. An image and description can round out the Team profile.
*Spaces are not permitted.
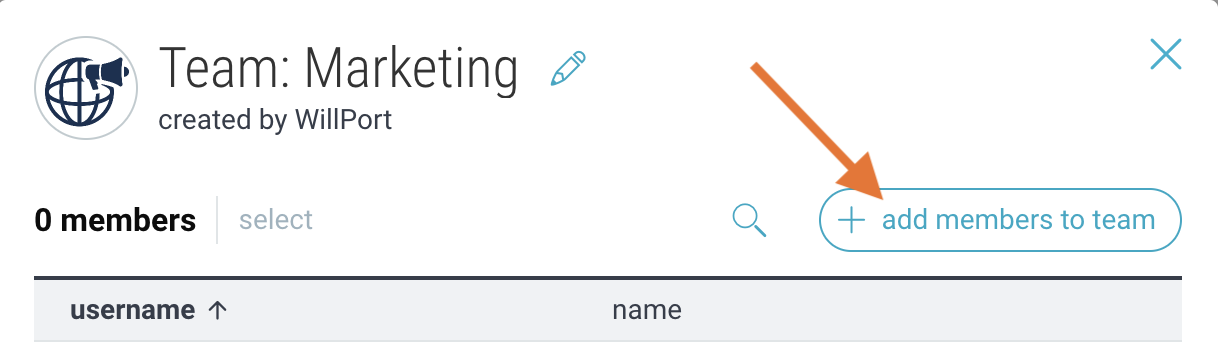
Add members to teams
- To add a member to a Team, they must first be added to the Organization.
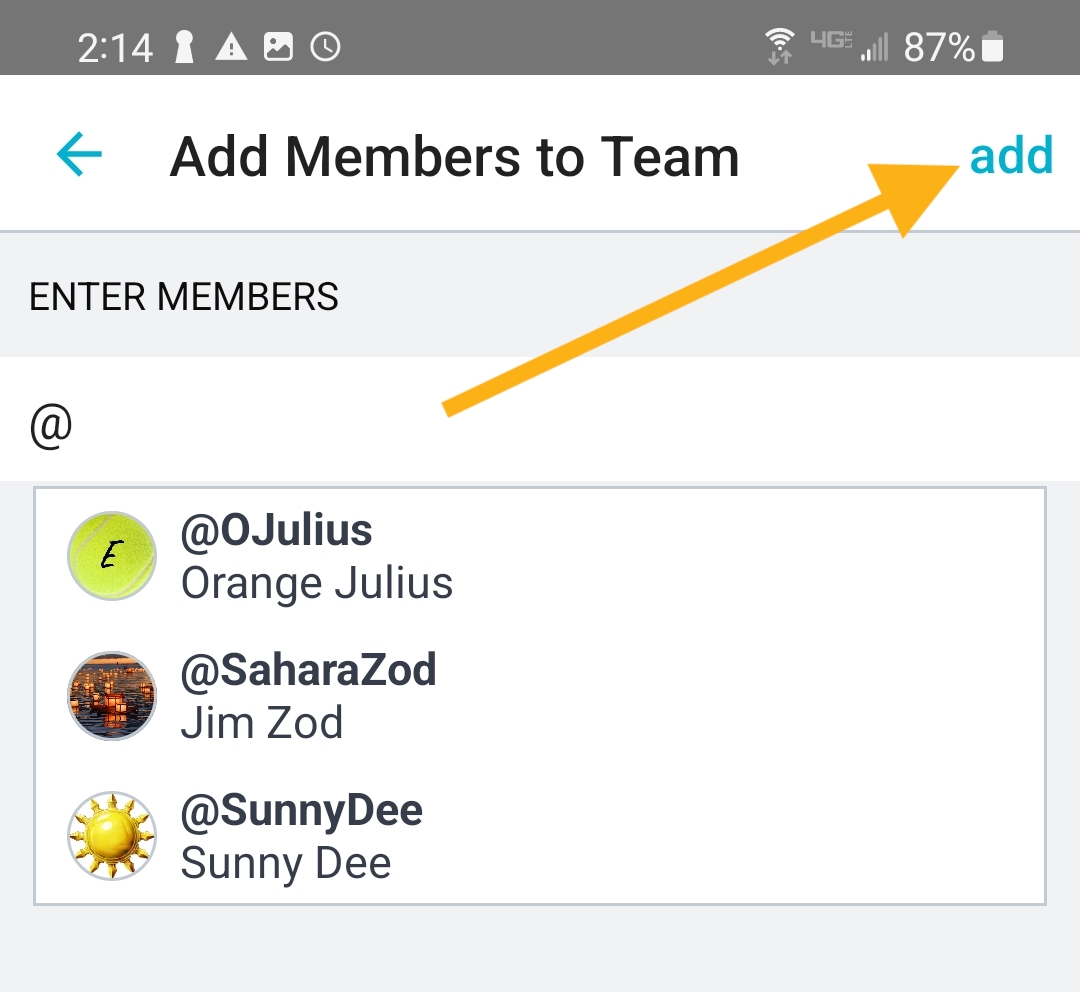
- Tap on a team name and then select “+ teams and members”.
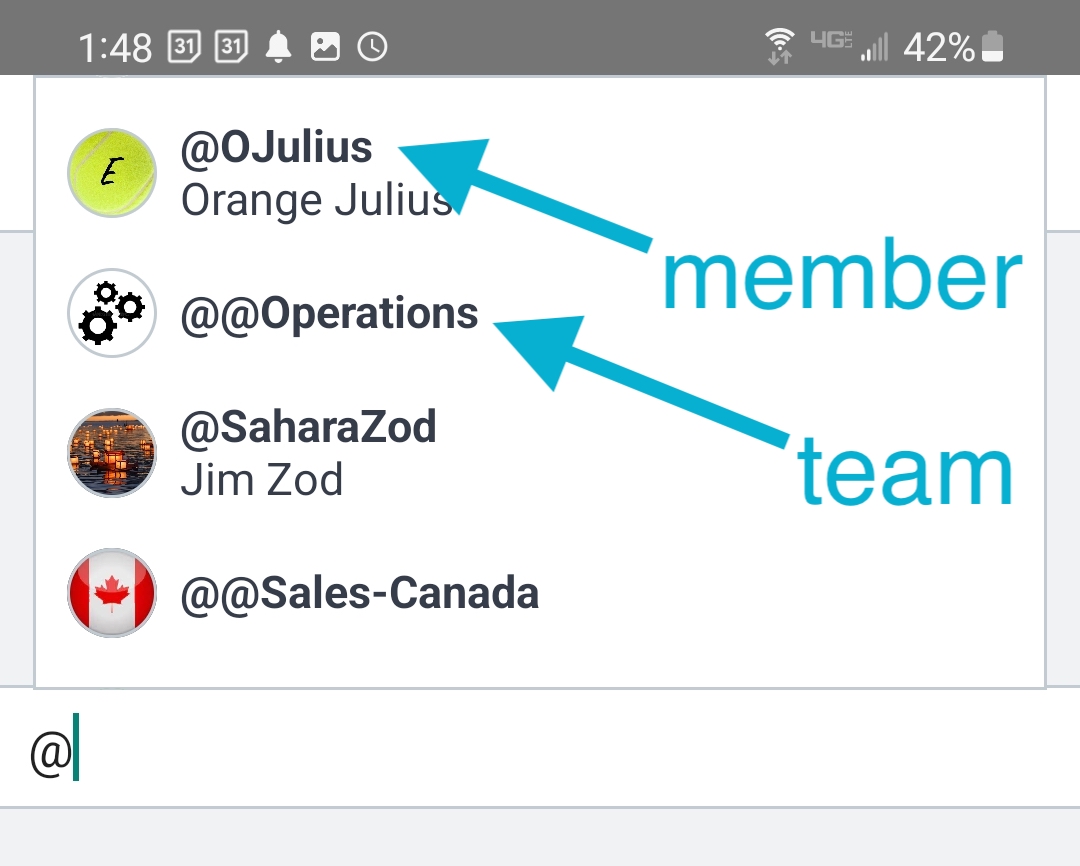
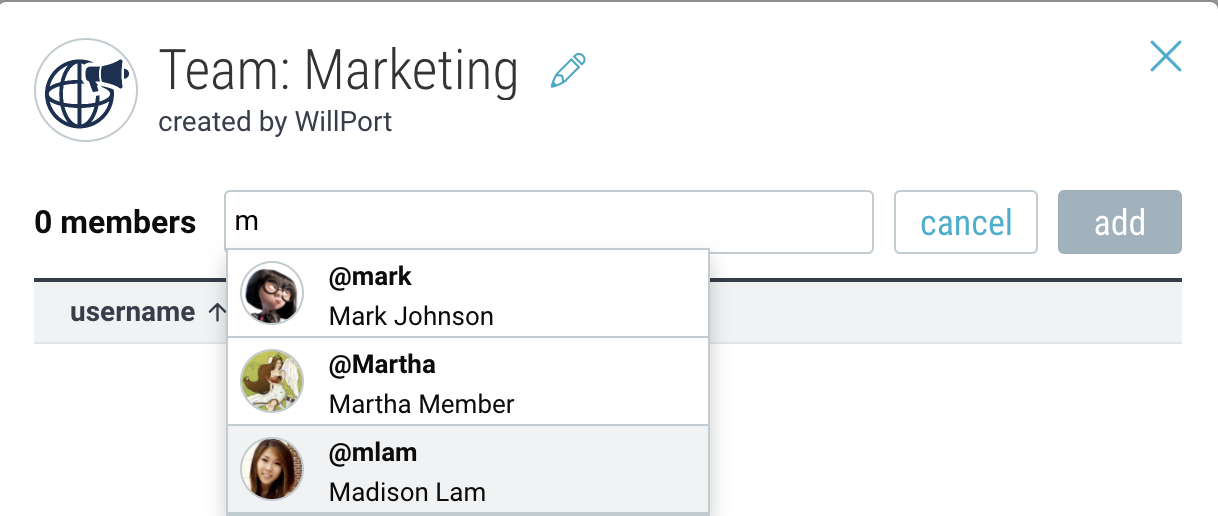
- Start typing a name, and members of your Organization that match will automatically show in a drop-down. You can type “@” to see the full list of Organization members.
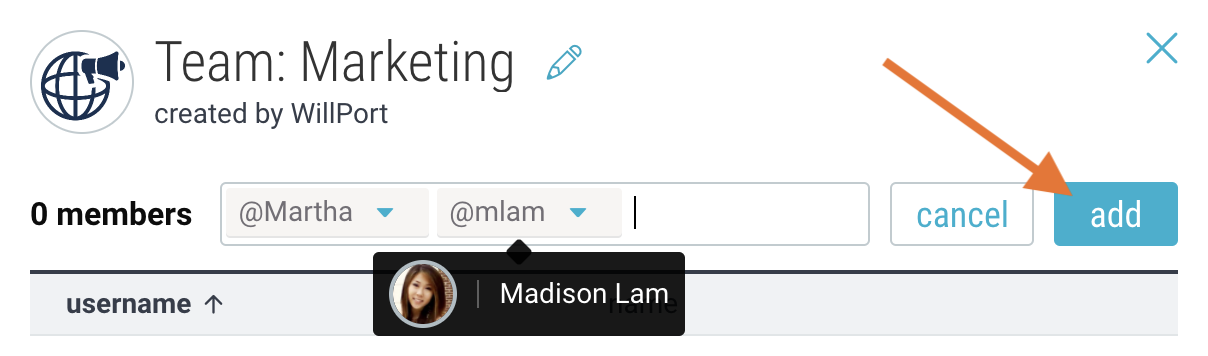
- Tap on members and then select “add” to add them to your team.
Note: A member cannot leave a Team. Only someone with admin permissions can remove Team members.
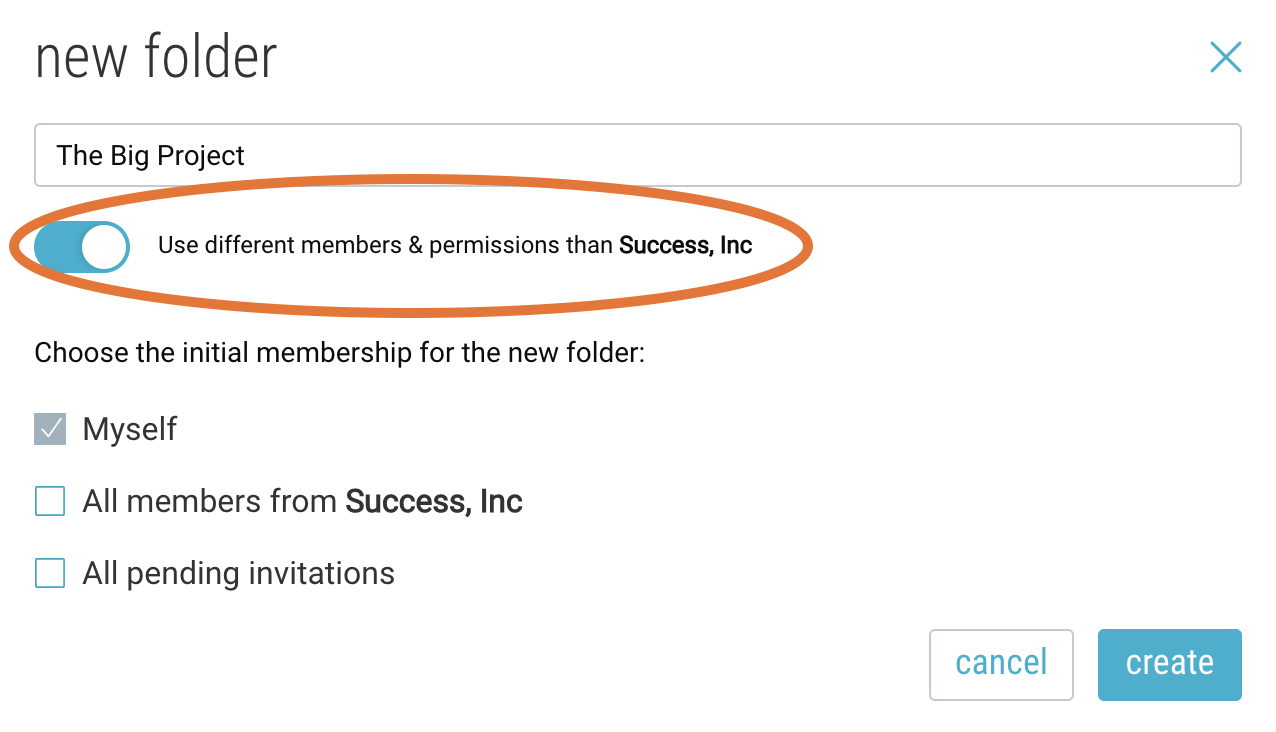
Set up your organization in subfolders
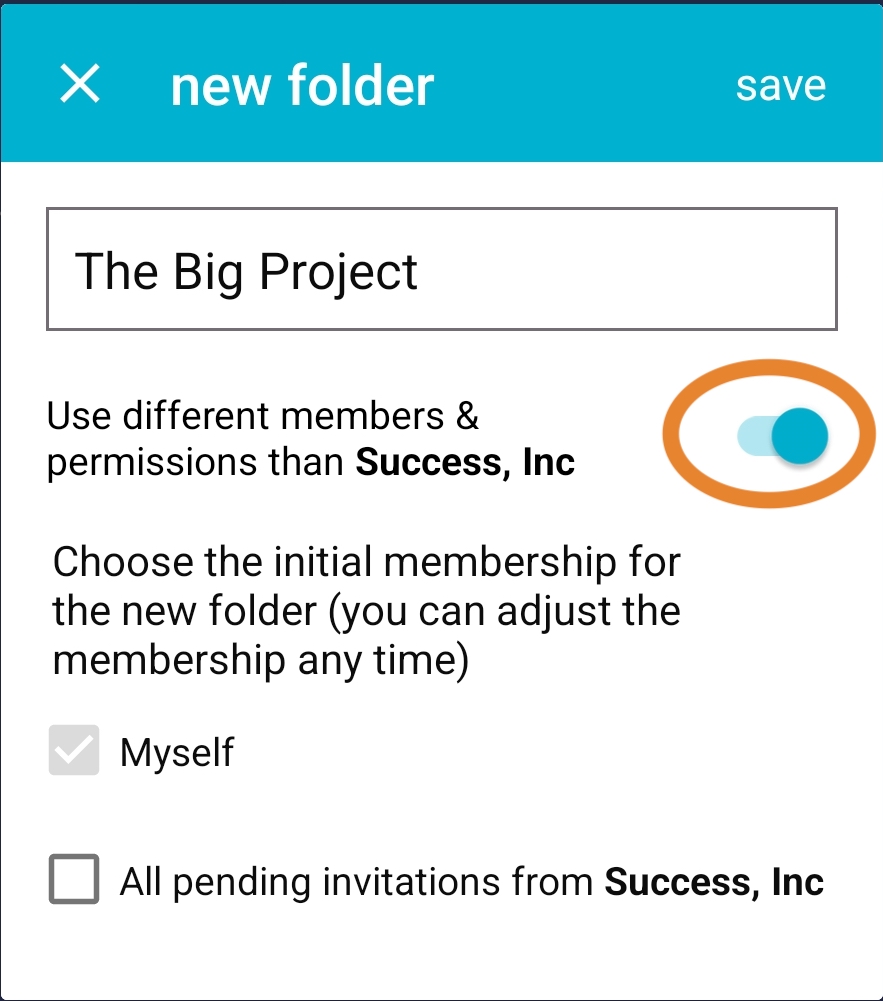
Your subfolders will inherit the membership of the Organization (the parent folder), unless you choose to manage it separately. To set up your various departments or projects, create folders and select “use different members and permissions”.
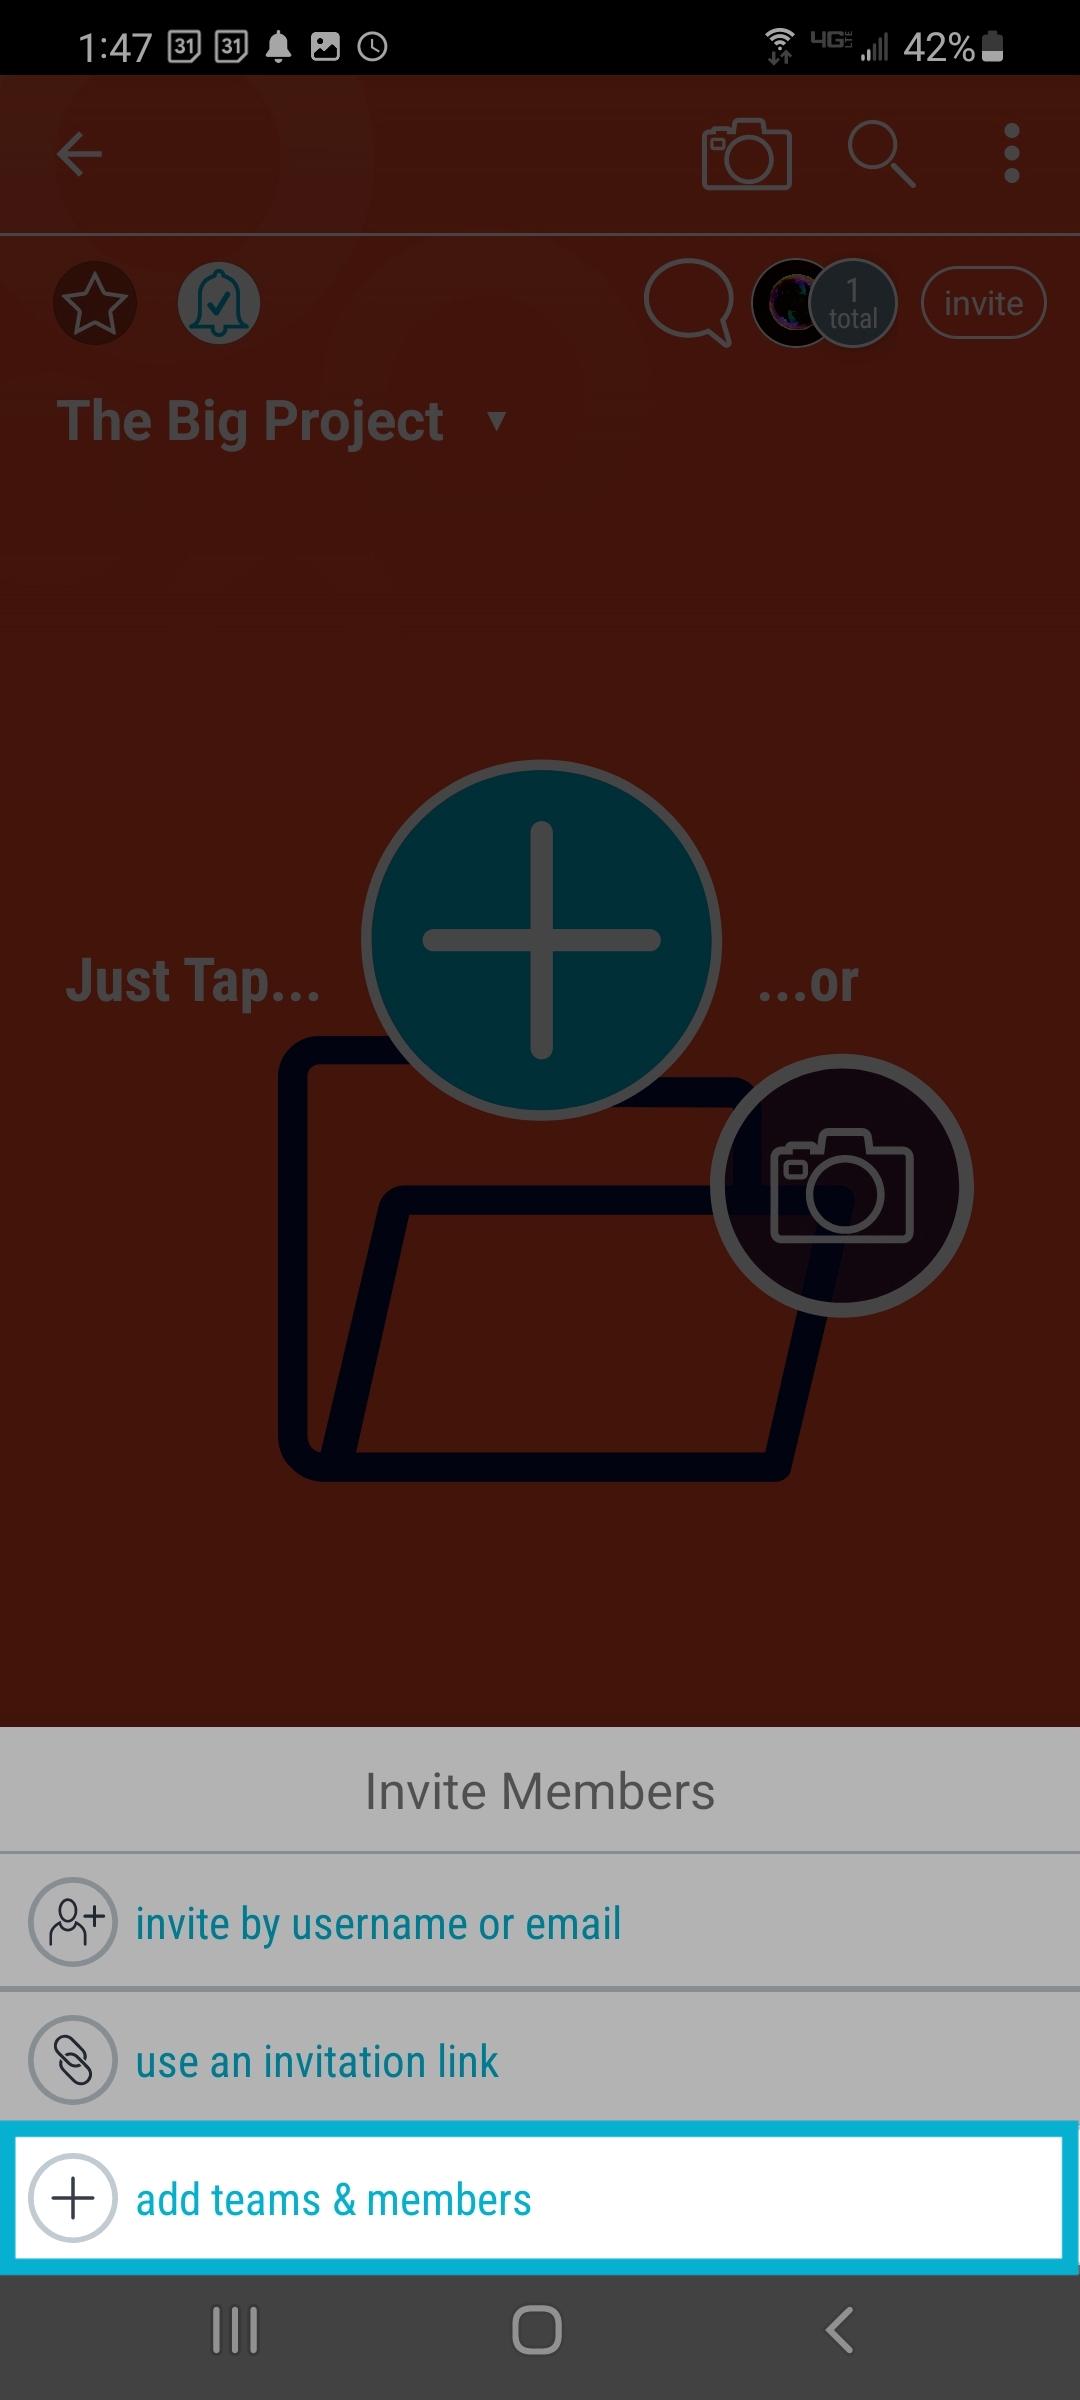
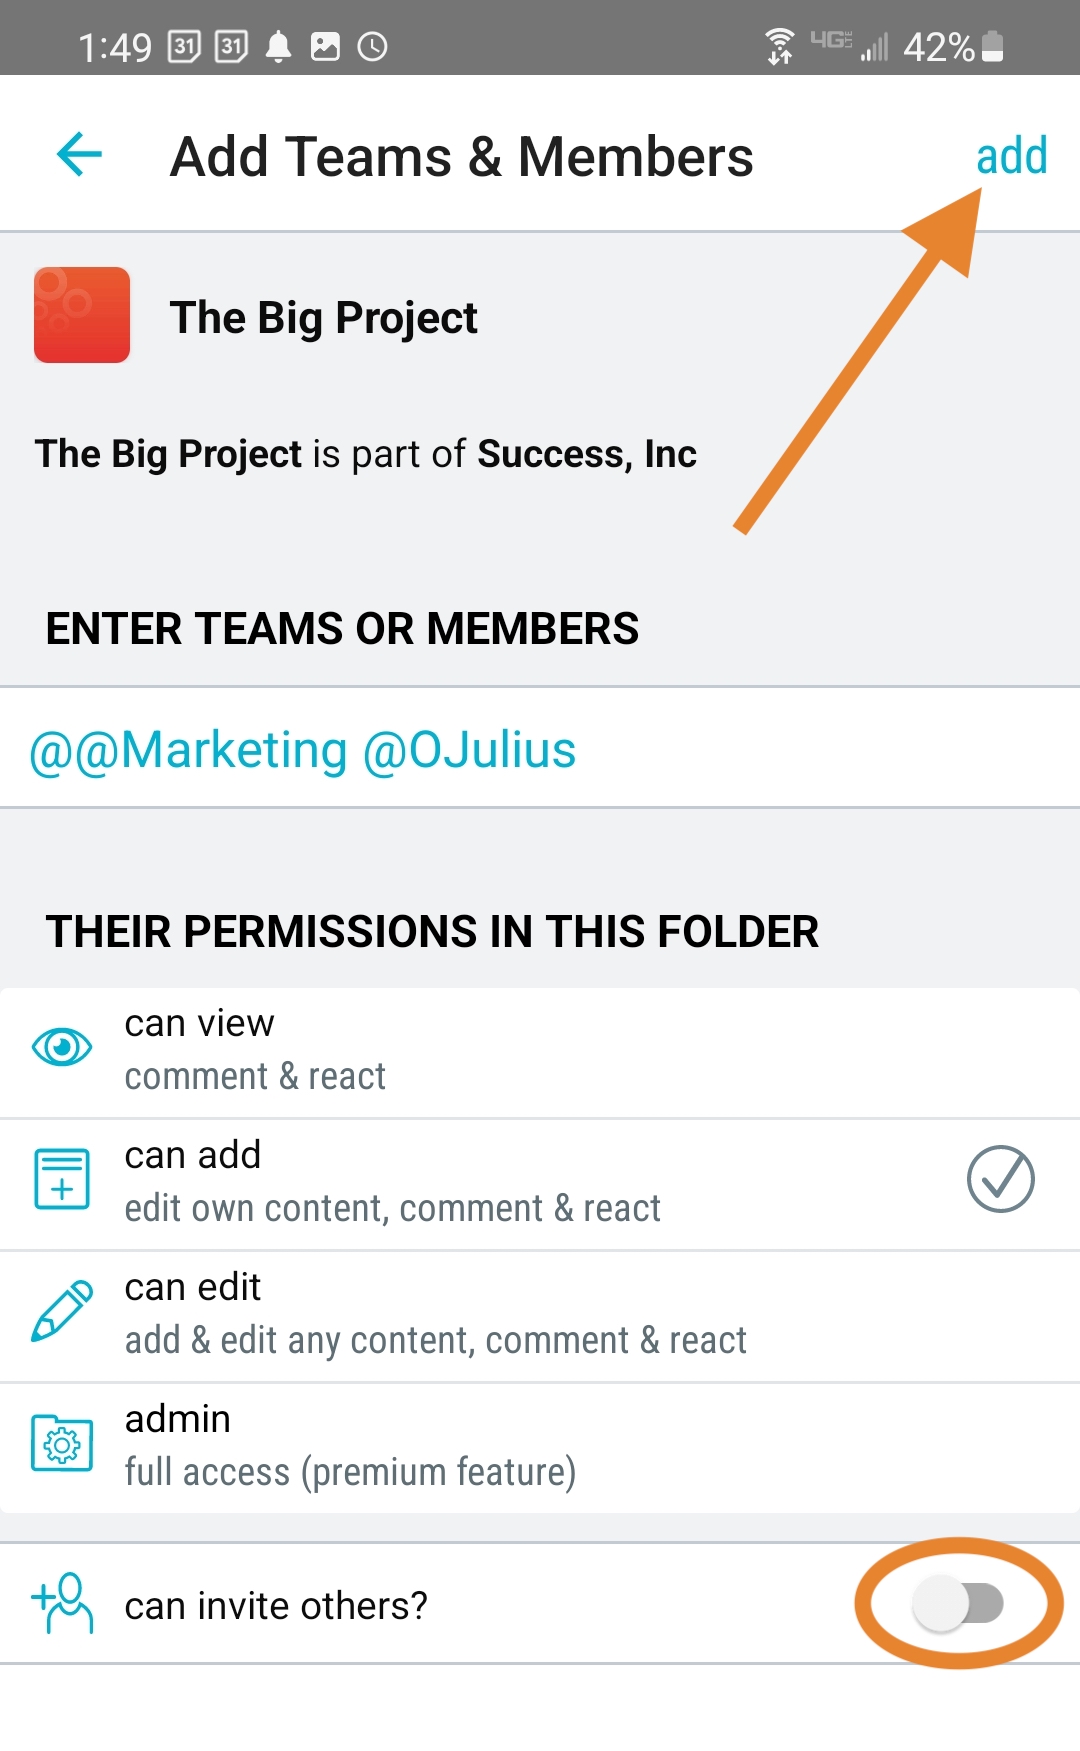
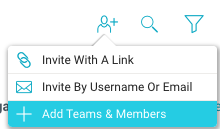
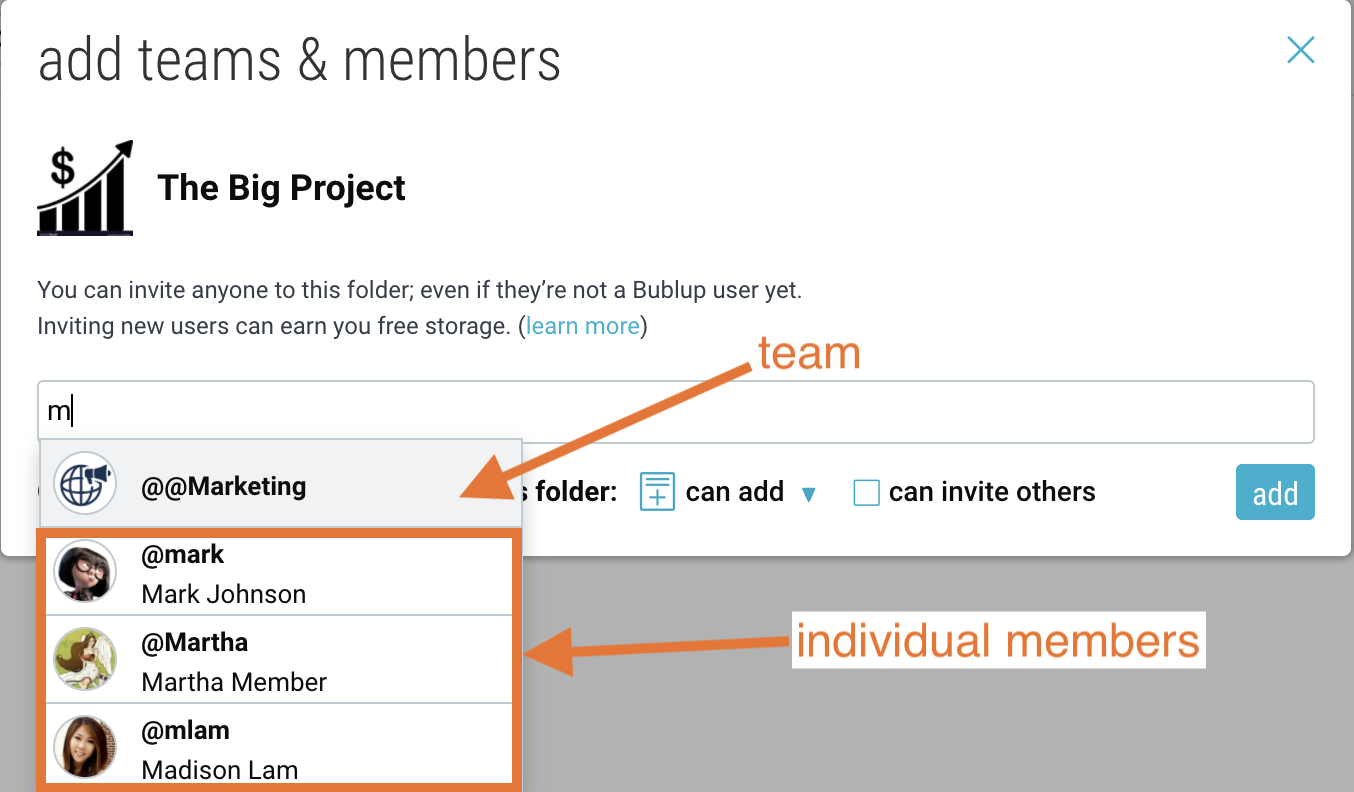
Next, tap on the invite icon and select “Add teams & members” to begin adding people.

When you add people to subfolders, your Teams will show up along with the members in your Organization, allowing you to manage the membership of your folders by Team, rather than individually.
- Select the Teams to invite (admins can simply add, without “inviting”.)
- Set their permissions.
- Decide of they should have invite privileges to the folder.
- Hit “add”.
You can also invite individual members to a folder without needing to invite them to a Team. This allows for flexibility in cases where someone is not a full-time Team member, or consulting, for example.
Note: If a member is both added individually and as part of a Team, they will have the higher of the permission levels assigned.
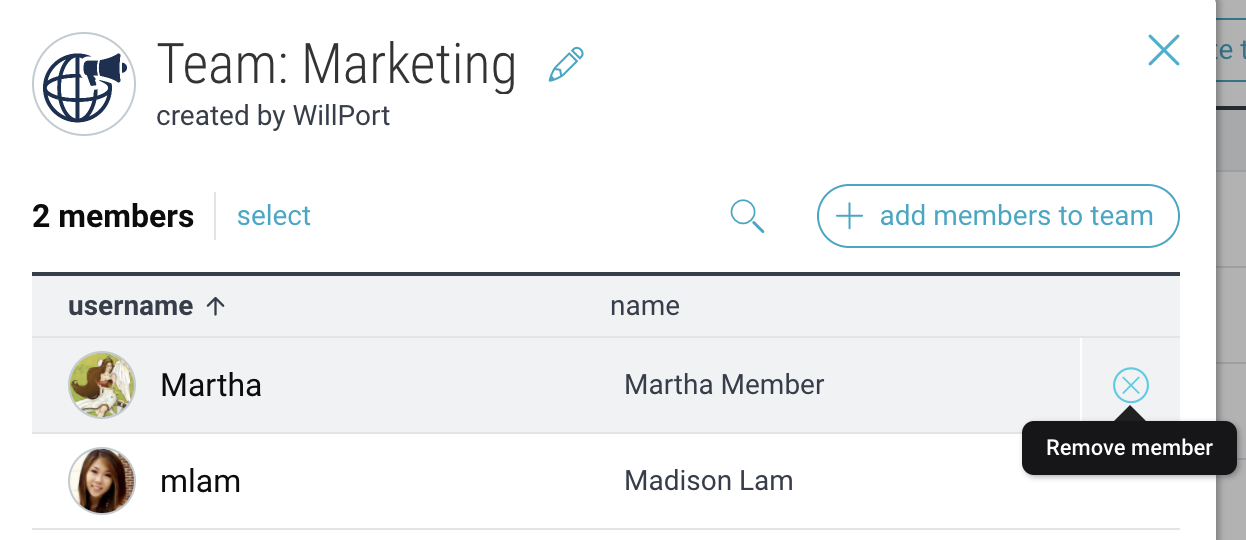
Removing members from a team
To remove a member from a Team, open the Teams menu and select the Team. Then swipe left on any teams or members you want removed.
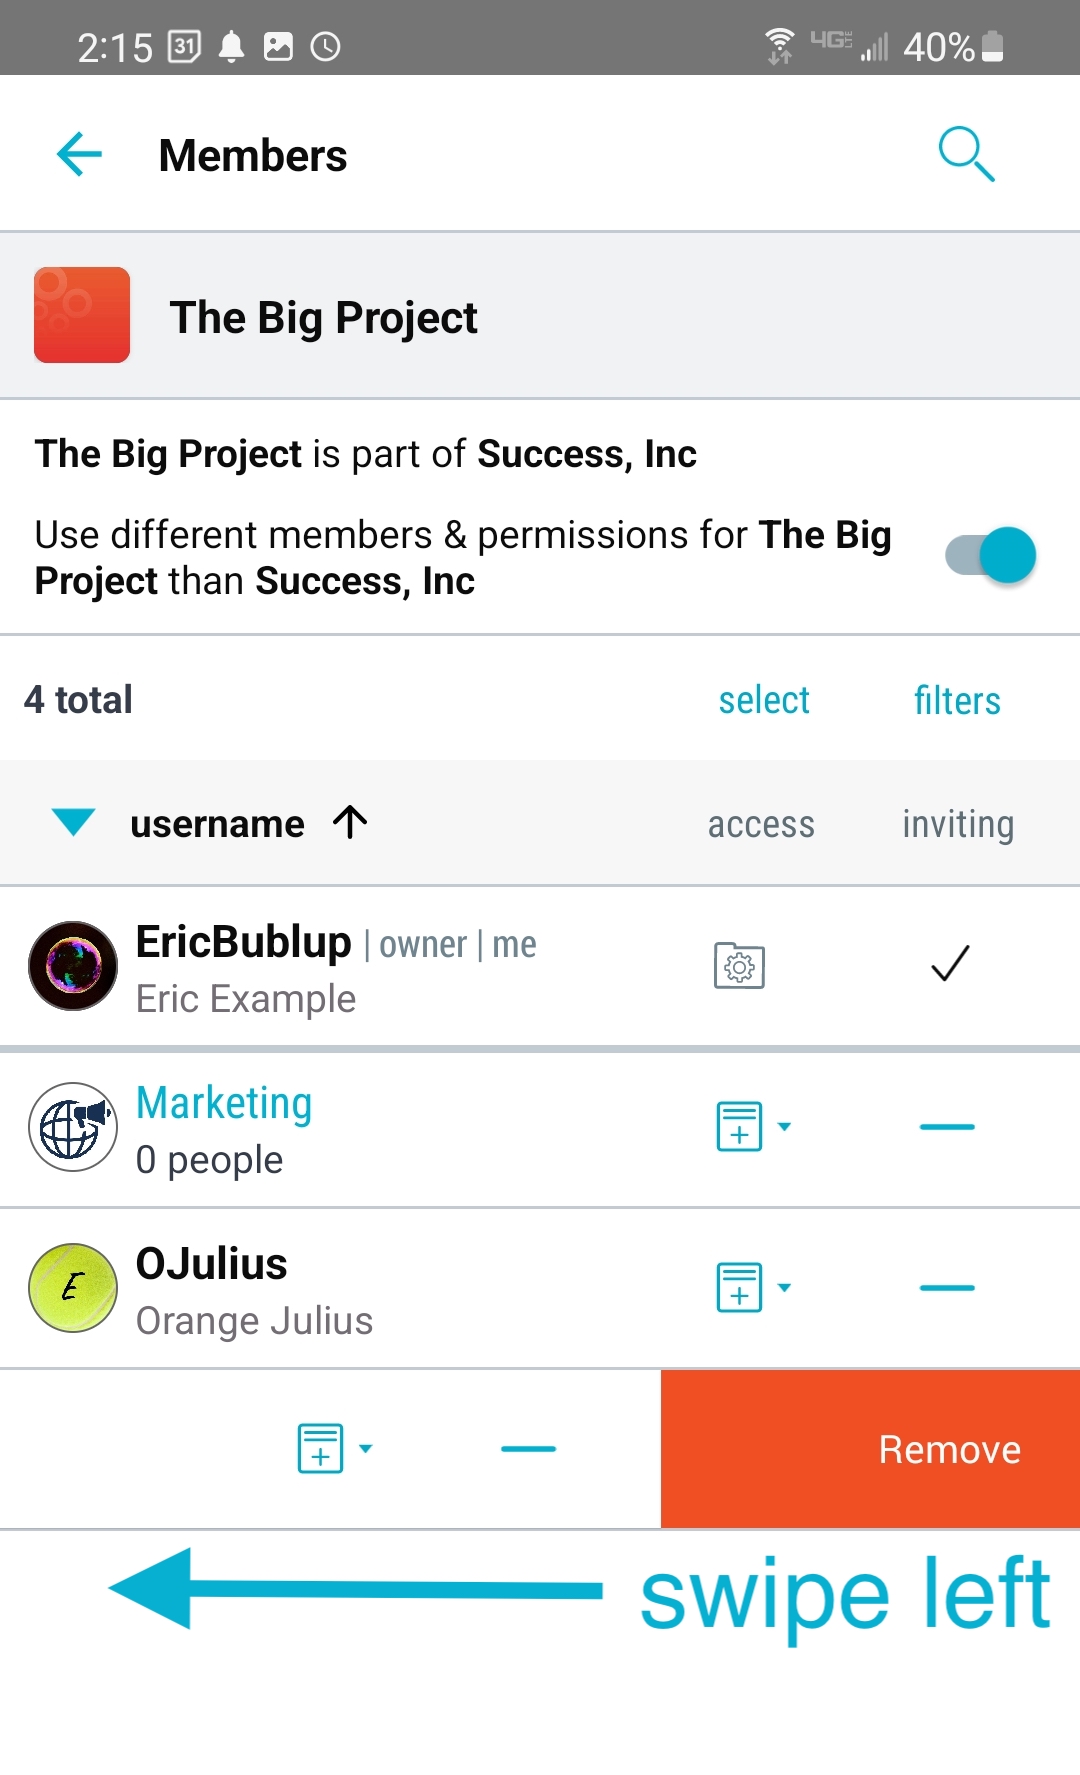
When you remove someone from a Team – they are automatically removed from any folders that Team is in. However, if they are also an individual member, they will still be in that folder.
Note: If you are removed from the top level of an Organization, you are automatically removed from all Teams and folders within that organization.
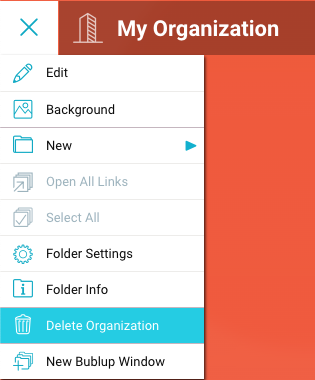
Deleting an organization
Deleting an organization is a destructive process – there is no undo.
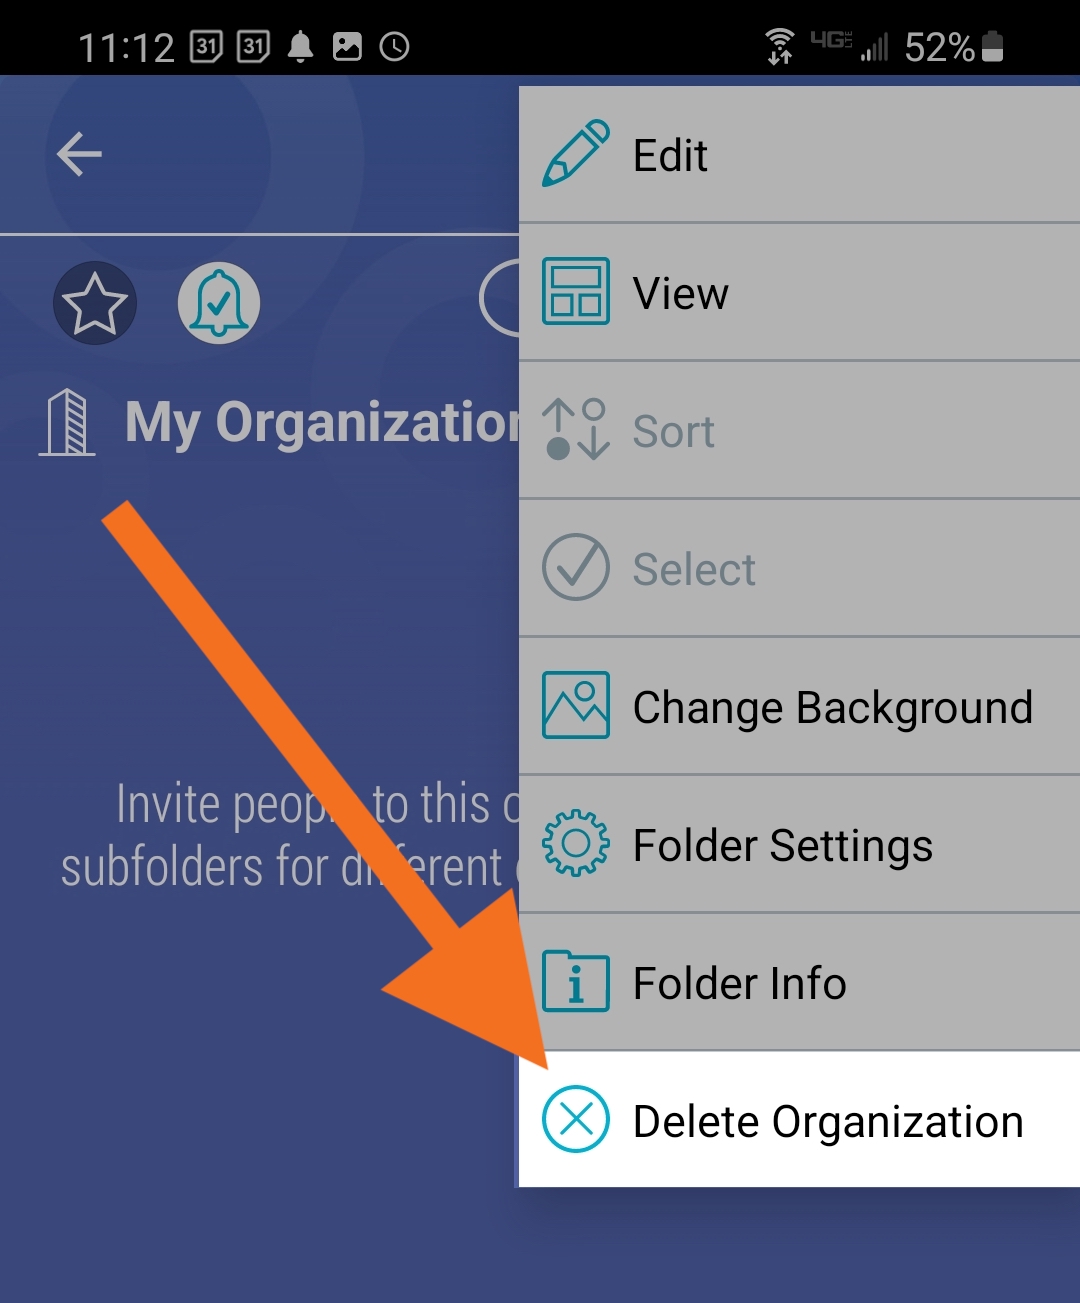
From the top level menu, select “Delete Organization”. You will be shown a warning and asked to confirm the decision.
Our teams and organization feature makes working together simple and effective.
Some basics about Organizations in Bublup:
-
- Creating an Organization requires a Business or Enterprise account.
- Anyone invited into an Organization will be asked to create a Bublup account, if they do not already have one.
- The Organization owner’s storage is shared by all of its members.
- Org Members have access to these features.
- # of Members:
- Business: 3 staff included
- Enterprise: 10 staff included
- Additional members available for purchase for $10/month.
Setting up your Organization
If you have subscribed to a Business or Enterprise plan, you should automatically have an organization added to your Bublup home, or you can create an organization by going to the home menu and selecting “create organization”.
Note: you can only own one organization, though you can be a member of multiple.
The owner of an Organization will see it as a special folder in Home, alongside Recents and Favorites. For Organization members, it will appear as a shared folder, with a special Org icon.

![]()
You can rename your Organization by selecting “edit” in the main menu at the top-level folder.
Purchasing & Managing Org Members
With Business, your first 3 members in your Organization (plus the owner) are included for free (with an Enterprise plan, it’s 10 free). For each additional Org member, you will be charged $10 per month. Org members have access to these features.
To purchase additional members, you must have a payment method on file with us. Visit Bublup’s payment site on desktop to add or update your card on file. Here you can also view your payment history and download invoices.
Once this is done, simply add members to your Organization, and you will automatically be charged each month based on the number of Org Members.
Adding members
Start filling your Organization by inviting members. The default permission for members is “view”, with the option to make them an “admin”. These permissions are for the Organization only. More refined permissions, “view”, “add”, “edit”, or “admin”, can be set on a subfolder level based on needs.
Using teams for easier member management
Once you have members, you will want to create your Teams. Click on the “Teams” button and then click “create team” to begin.

Teams must have unique names, which can only contain letters, numbers and dashes*. An image and description can round out the Team profile.
*Spaces are not permitted.
Add members to teams
- To add a member to a Team, they must first be added to the Organization.
- Click on a Team name and then select “add members to team”.
- Start typing a name, and members of your Organization that match will automatically show in a drop-down. You can type “@” to see the full list of Organization members.
- Click on members and then select “add”.
Note: A member cannot leave a Team. Only someone with admin permissions can remove Team members.
Set up your organization in subfolders
Your subfolders will inherit the membership of the Organization (the parent folder), unless you choose to manage it separately. To set up your various departments or projects, create folders and select “use different members and permissions”.
Next, click on the invite icon and select “Add Teams & Members” to begin adding people.
When you add people to subfolders, your Teams will show up along with the members in your Organization, allowing you to manage the membership of your folders by Team, rather than individually.
- Select the Teams to invite (admins can simply add, without “inviting”.)
- Set their permissions.
- Decide of they should have invite privileges to the folder.
- Click “add”.
You can also invite individual members to a folder without needing to invite them to a Team. This allows for flexibility in cases where someone is not a full-time Team member, or consulting, for example.
Note: If a member is both added individually and as part of a Team, they will have the higher of the permission levels assigned.
Removing members from a team
To remove a member from a Team, open the Teams menu and select the Team. Then hover over the member’s name and an “x” will appear to the right side. Click on the “x” to remove them.
When you remove someone from a Team – they are automatically removed from any folders that Team is in. However, if they are also an individual member, they will still be in that folder.
Note: If you are removed from the top level of an Organization, you are automatically removed from all Teams and folders within that organization.
Deleting an organization
Deleting an Organization is a destructive process – there is no undo.
From the top level menu, select “Delete Organization”. You will be shown a warning and asked to confirm the decision.